No sound?
At this point, you should hear sound from the booth speakers. If you don’t hear sound, check whether the L/R meters are moving in the METER field of the QL.
- If the L/R meters are moving on BOTH the QL and the ATEM:
It may be that the MONITOR channel hasn’t been turned on. Make sure you’re actually in SCENE A, and the Master section has ST L and MONIT as opposed to ST L and MONO. You’re likely in SCENE B if you see MONO. In that case, Press the 1–32 key and MIX/MATRIX key simultaneously to switch between fader bank A and custom fader bank B.
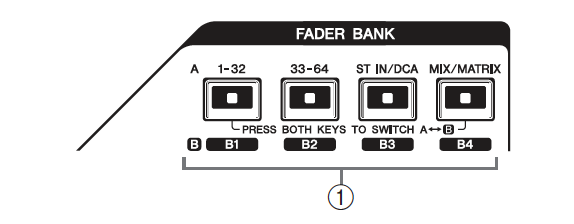
- If the L/R meters are moving on the QL BUT NOT the ATEM:
It may be that the Aux cable behind the ATEM got detached, or that the connection has come loose somewhere along the snake. Check the STEREO connection in the back.
- If the L/R meters are not moving:
Make sure that signals are being routed correctly to the patched input channels.
I can’t move the faders
This is because the console is locked. If you see a black console screen with CONSOLE LOCK text on it, touch anywhere on the touchscreen to unlock. Then proceed with production.
I can’t control the headamps/phantom power
I will show this for QL/CL and DM series, since the interfaces are different. If you still can’t see headamp on the console, make sure the channels are patched in DANTE Controller. When devices are unmounted and then remounted, the patching tends to disappear.
Mounting DANTE I/O on QL/CL
We use an I/O device to remotely control head amp that is connected to the QL/CL console.
- Go to
SETUP,DANTE SETUP, and press theDEVICE MOUNTtab in the lower part of the window. - Press any of the I/O device select button (the box after #x). A connected I/O device should indicate green. If you see a yellow bar with
virtualtext, you need to remount this device. - In the DEVICE SELECT window, press the
ONLINE DEVICE LIST. - Use the [TOUCH AND TURN] knob to select devices within the network, e.g., RIO1608, Shure receivers, etc..
- When you have finished making settings, press the OK button to close the window.
- Check the patching in Dante Controller.
- Reboot the I/O devices (first) and the Console (last), in that order.
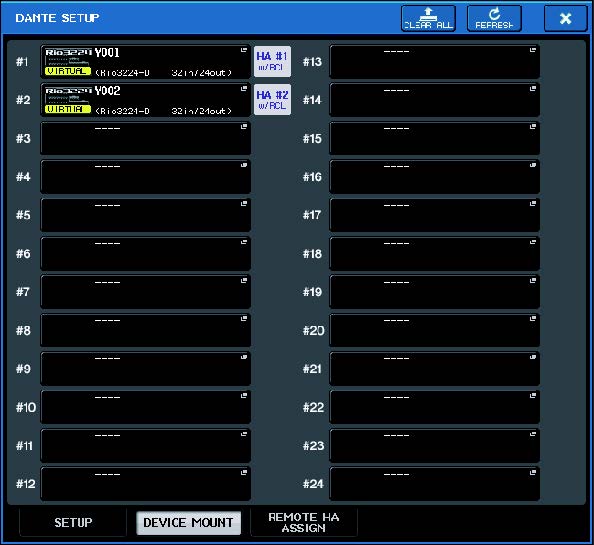
Device Mount
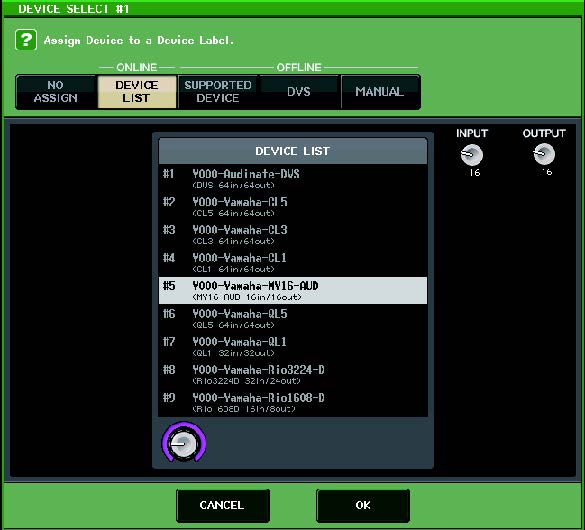
Online Device
Mounting DANTE I/O on DM3
DM3 will automatically mount any patched and supported DANTE I/O. If you have a patched I/O that’s not showing up, check below for their Dip Switches settings. To check that DANTE I/Os are automatically configured:
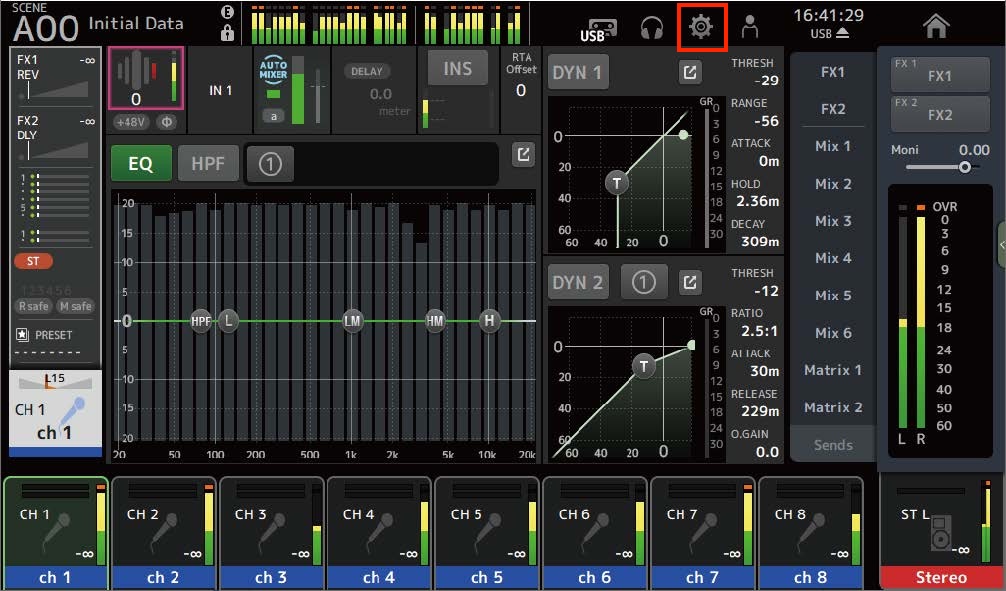
- On the
homescreen, press the gear icon on the top right to enter thesetuppage.
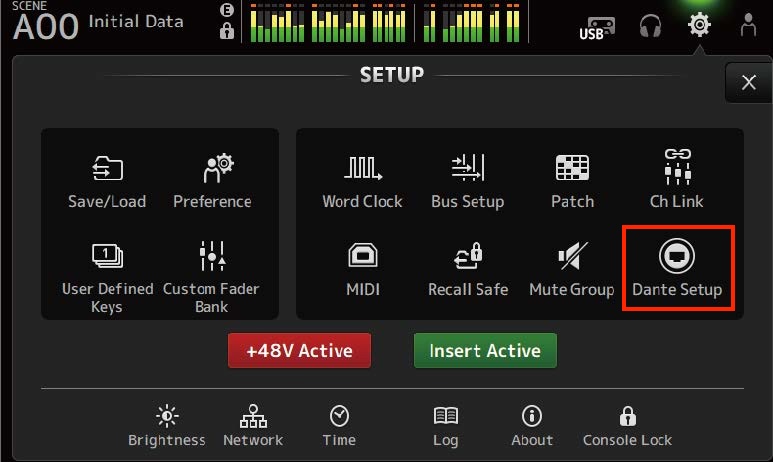
- From there, go to
Dante Setup. InDante Setup, you want to make sure:- Unit ID is set to Y003*,
- Secondary Port is set to Daisy Chain, and
- You’re logged into DANTE Domain Manager (You might need read and write privileges to change the patching).
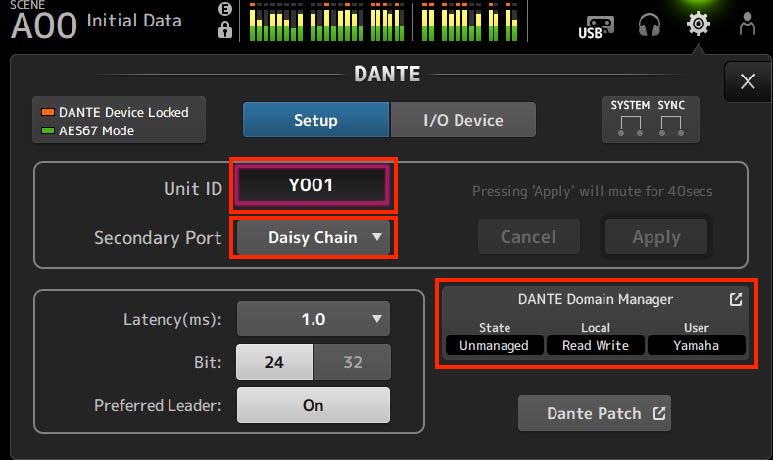
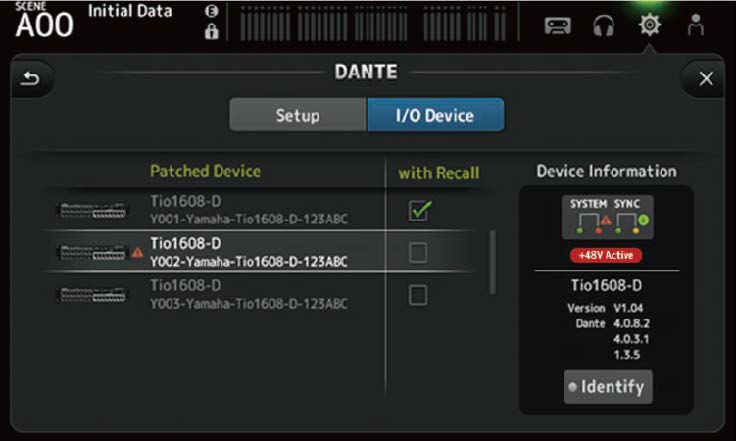
- If things are patched in Dante Controller, you can go to
I/O Deviceto check that devices are patched. You want to make sure the R I/O unit has bothSystemandSynclights indicate green. If not, check the following section on how to set the R I/O unit and power cycle both devices.
Note on R I/O Dip Switch settings
Long story short, here’s the dip switches settings for
- Kracum: only 2 and 4 down, the rest is up
- Applebaum: only 2 and 7 down, the rest is up.
Here’s what each dip switch does.
- Switch 1 (Unit ID) This switch determines whether the hex setting of the UNIT ID Switch will range from 0 to F or from 10 to 1F.
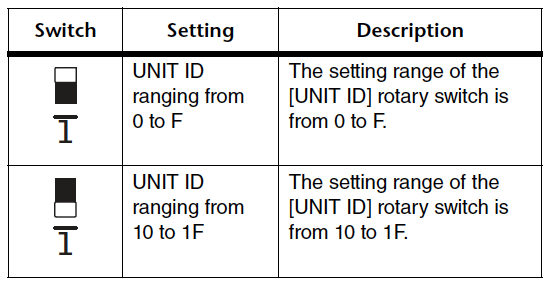
- Switch 2 and 3 (IP Select Mode)
These switches specify (basically) the ranges/type of IP addresses used when communicating. This is what we were having trouble with before.
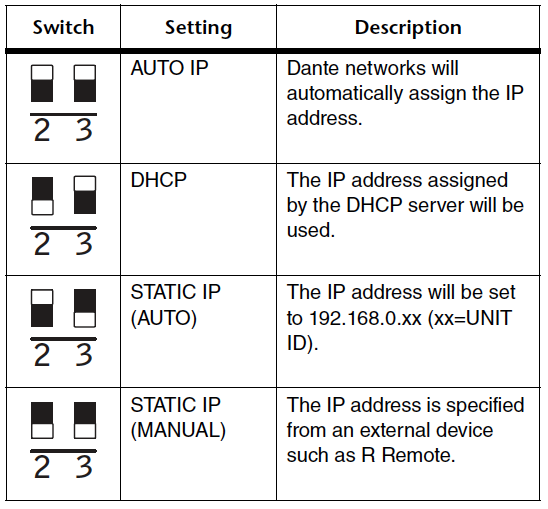
To confuse their users, Yamaha uses 3 different IP schemes: DHCP, Auto IP, and Static IP. Older devices, such as the first generation of RIOs, don’t have the ability to specify this themselves, so you’ll have to set this manually. DHCP (the Yamaha setting) is when the IP addresses are handed out by an external DHCP (the technology) server (e.g., 10.210.x.x); this is what we’re using, so you should put 2 down and 3 up.
Auto IP is a Yamaha setting. It can be DHCPed (the technology). This is when IP’s are in the 192.168.x.x range, which is typical for a home router. Follow this if you’re using this range.
To further confuse you, you can set it to STATIC IP Auto, so the IP of each device will be 192.168.0.x, where x is the unit ID.
Lastly, you can always set IP’s statically.
- Switch 4 (Secondary Port)
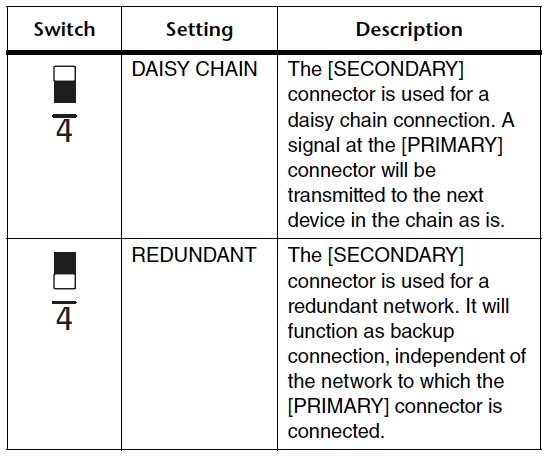
For places with a dedicated secondary Dante network (i.e., Kracum), you want to have the switch on redundant mode. For places without a secondary network (Appleabaum), it’s best to leave this on daisy chain mode.
Always check if you have a secondary network in place. If you daisy chain two separate networks together when they’re not supposed to, you can create a broadcast (network) storm. This is true for consoles as well. Make sure they’re set to redundant mode when they have a redundant network connected.
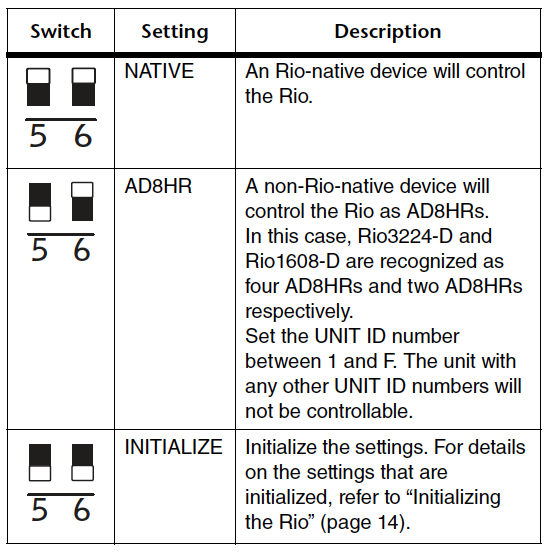
- Switches 5 and 6 (Remote)
Set this to NATIVE since we only use Yamaha consoles.
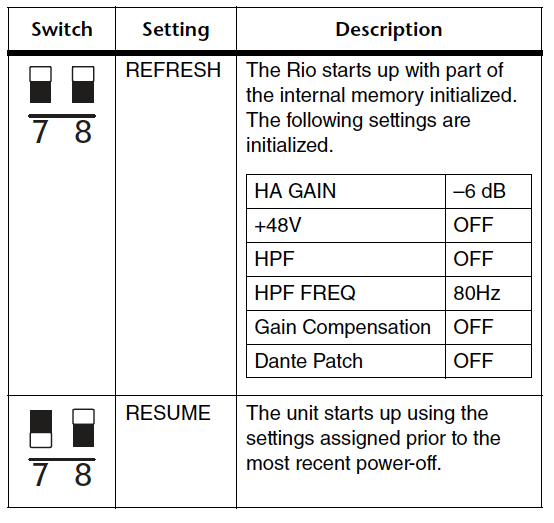
- Switches 7 and 8 (Start up)
You can leave this the way it is. Whenever you recall a scene on a console, you’ll recall the headamp settings, so it’s not a huge deal if the headamp gets refreshed.
I’m doing a separate broadcast mix from the FoH mix, and I can only hear audio coming out of one console
This happens when multiple consoles are sharing the same Dante channel, but the transmitting channel doesn’t have multicast enabled. Before we begin, it’s always good practice to check the Rx and Tx channels are patched correctly.
By default, Dante uses unicast to transmit audio. You’ll need to enable multicast manually if you want the same channel of audio to go to different devices downstream. To do this, first log into Dante Domain Manager.
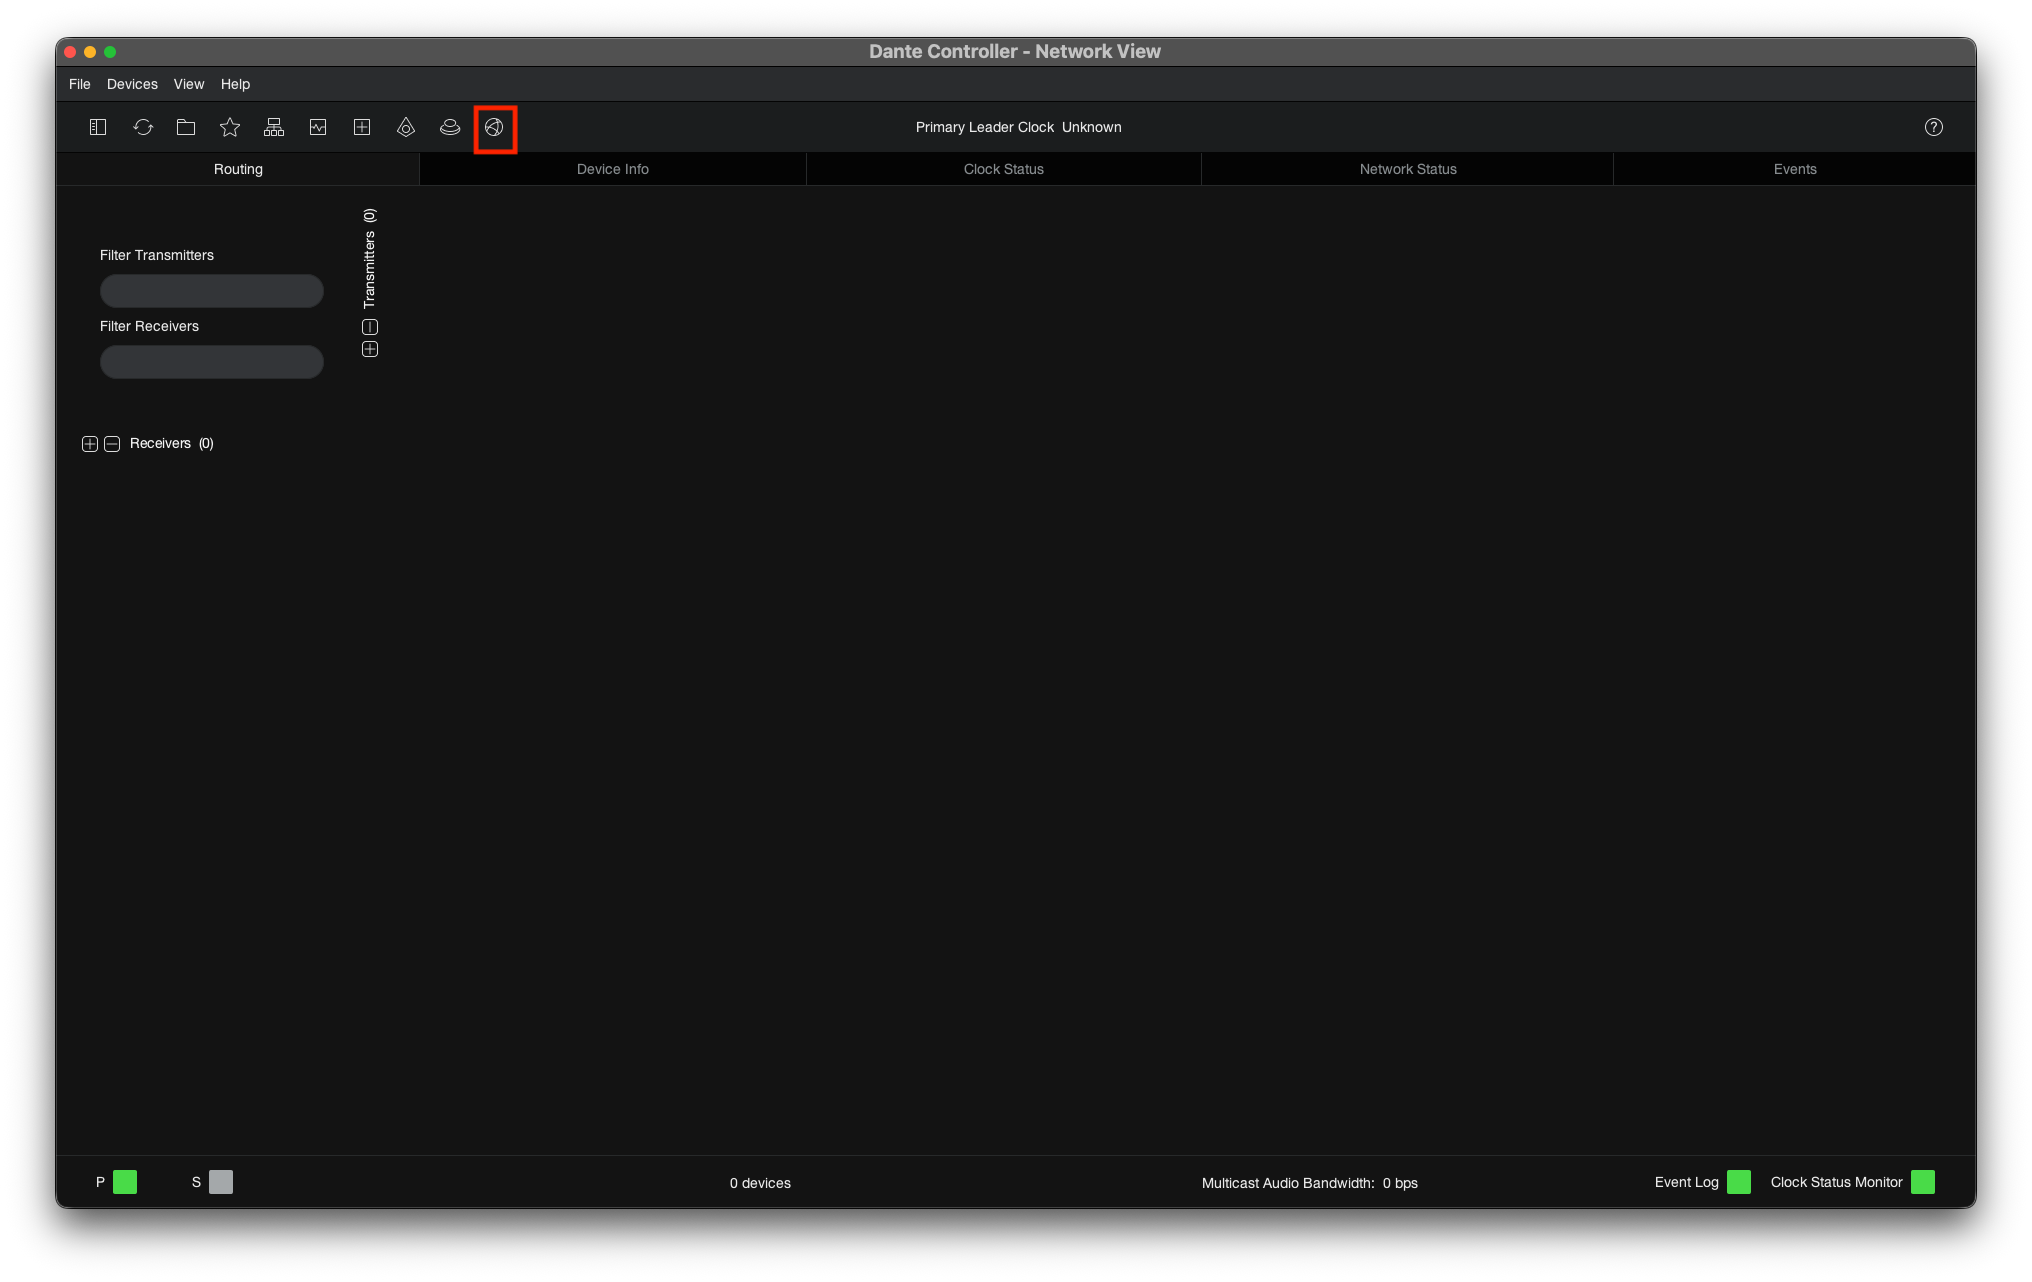
Dante Controller
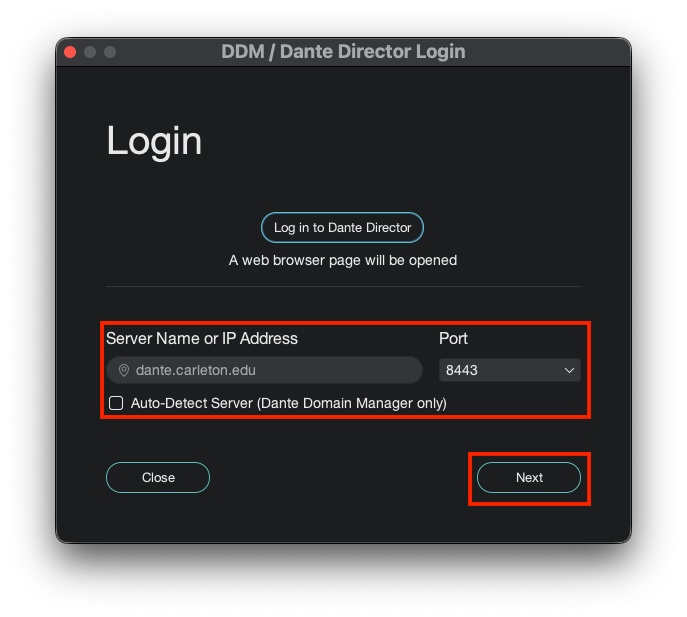
DDM Login
- Open up Dante Controller. Because we have Dante Domain Manager (DDM) installed, click the DDM icon on the toolbar to login.
- You’ll see the login interface. Enter our DDM server dante.carleton.edu, and select Next. You’ll then be asked to enter your credentials. Enter your Carleton username and password.
- Once logged in, go to the domain selector and select
WCC-MUSC-Perform.
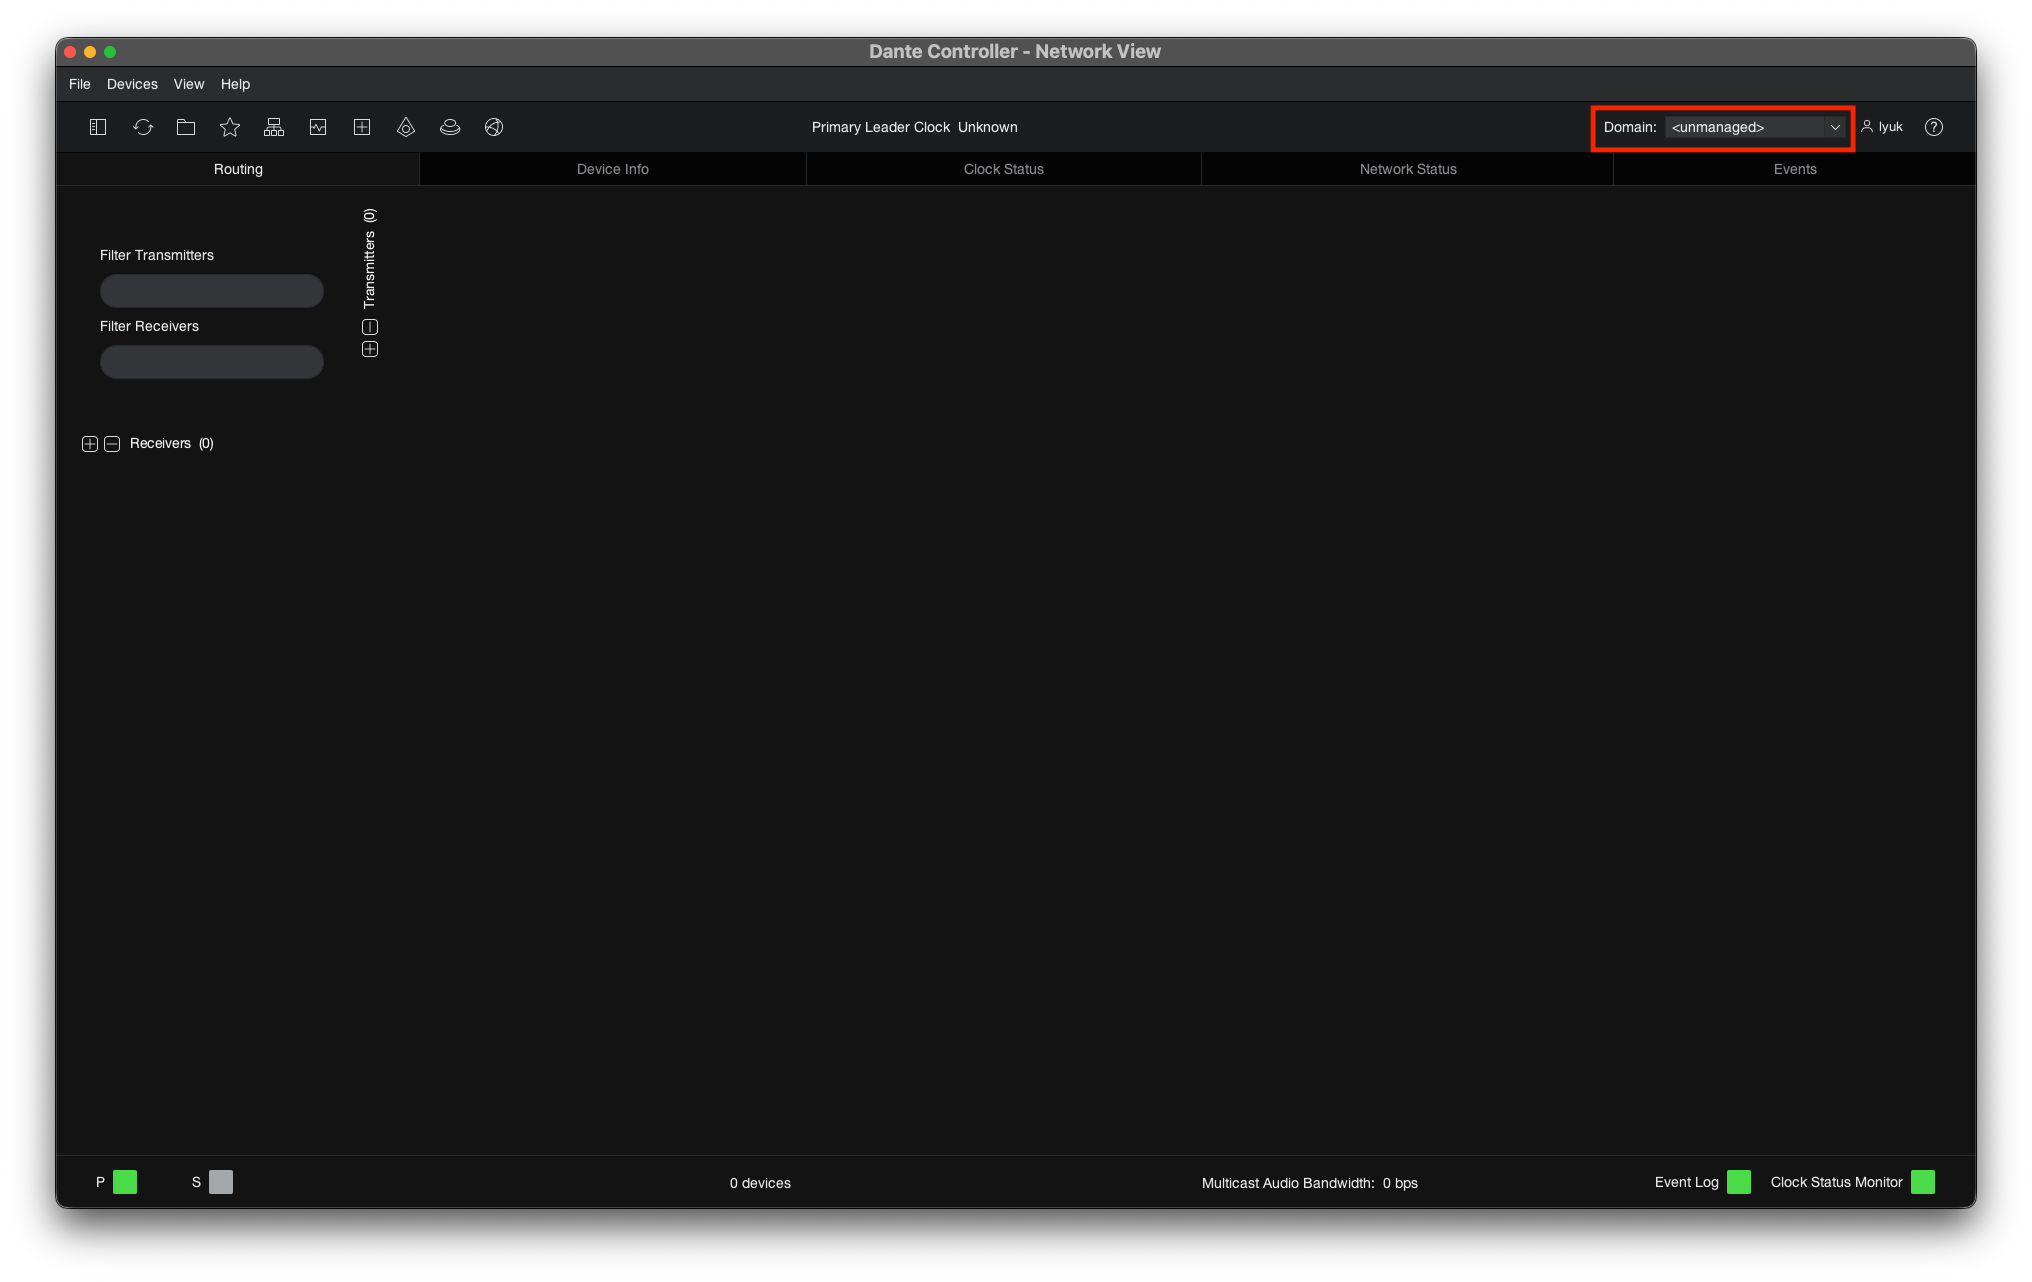
Dante Controller
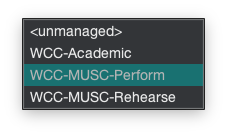
DDM Domains
You should see the following devices:
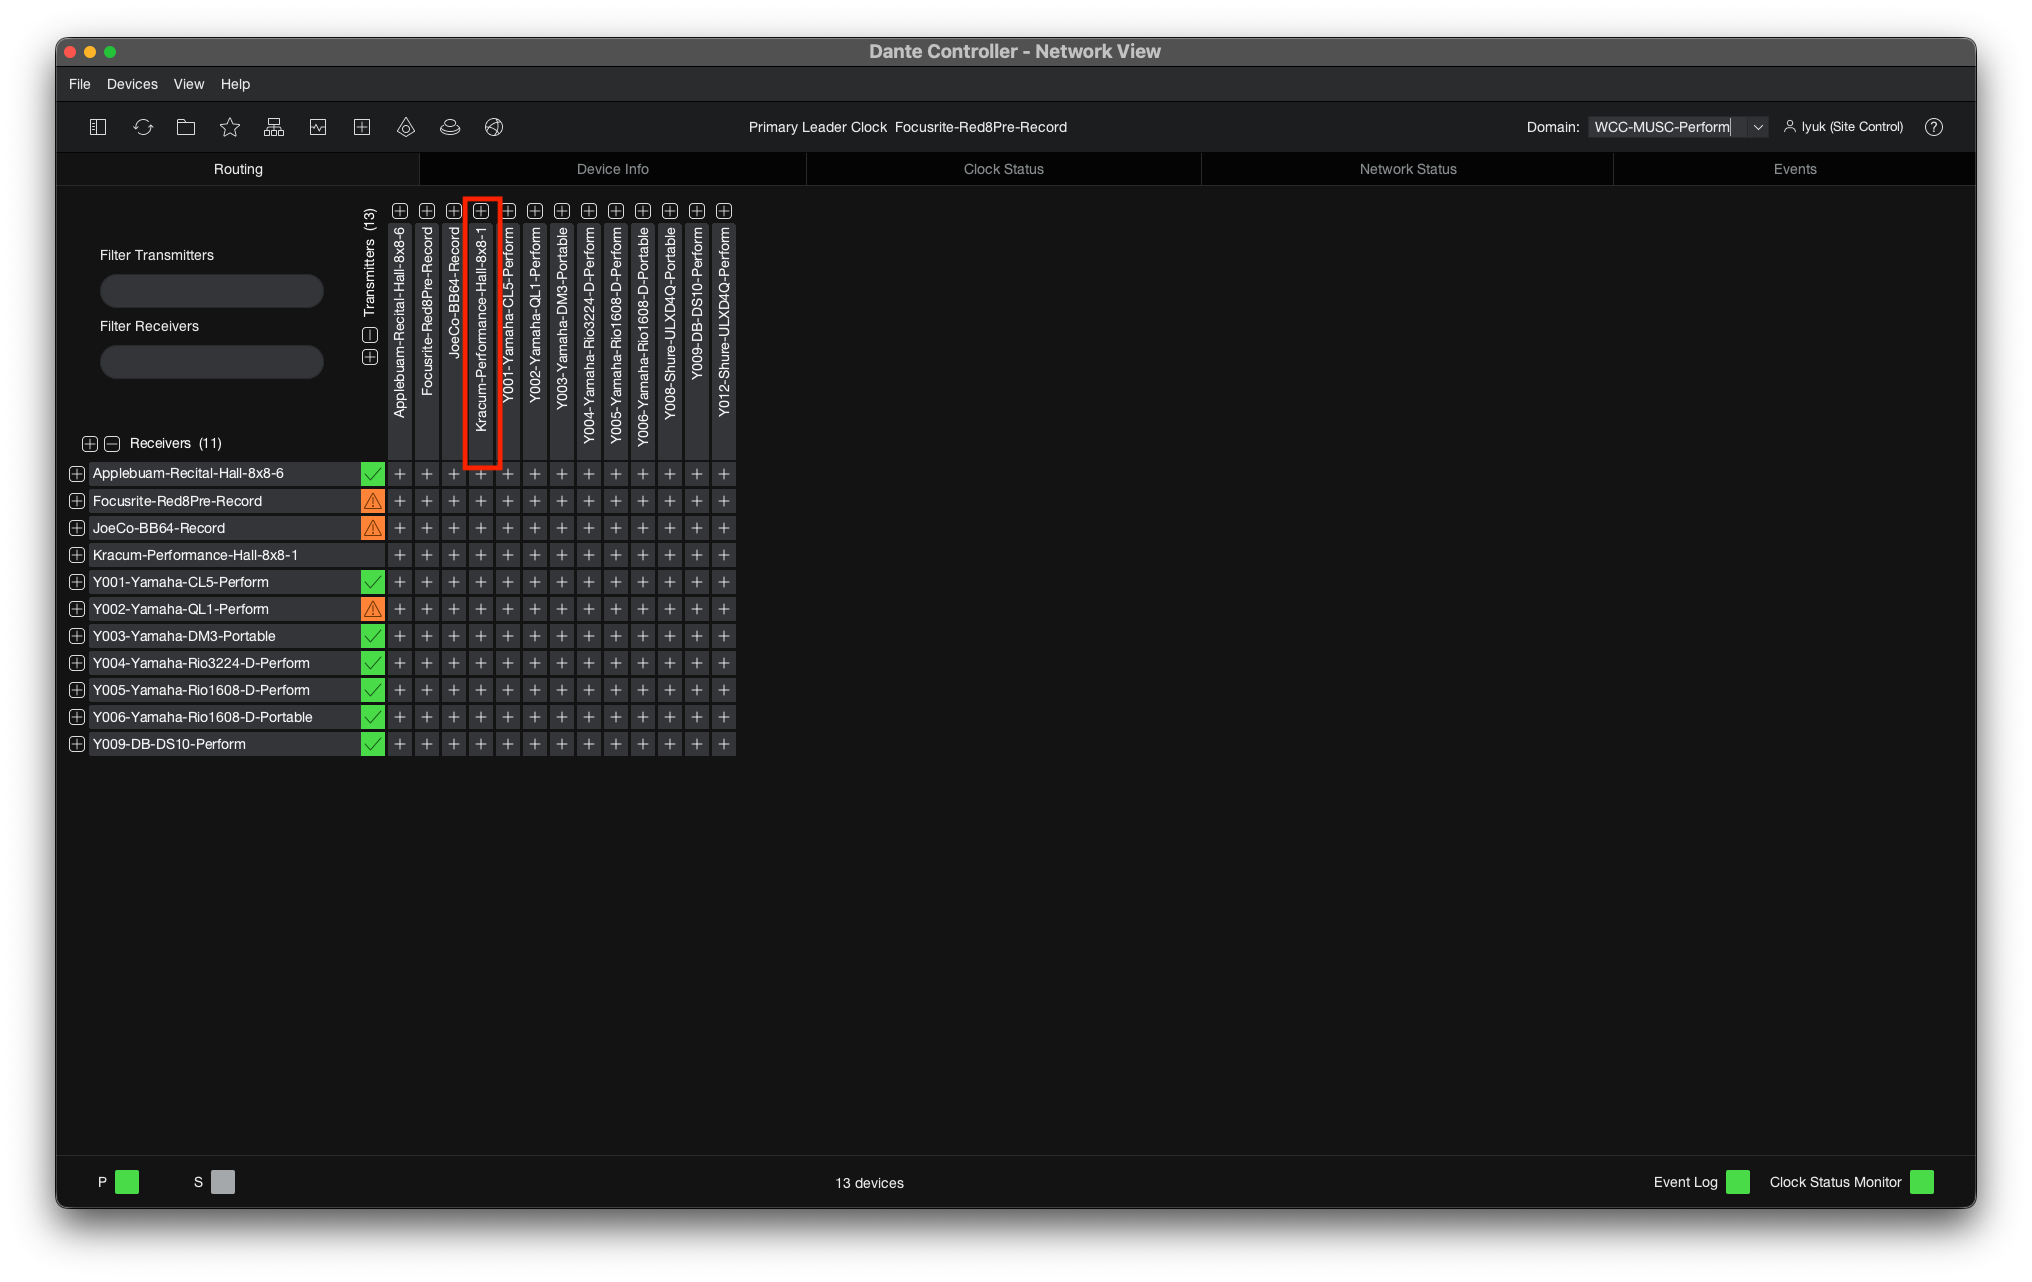
Now that you’re logged in, choose the Transmitting device you wish to configure multicast on. In my example, I’ll be using Kracum’s Symetrix Prism DSP:
- Double-click the transmitter to bring up the device view. Navigate to the
Transmittab. Click the multicast icon, highlighted in red below. - This brings up the page to create multicast flows, if none are already configured. Click
Dante, choose8for max channels per flow, and select the channels. You may pick specific channels, but you can also simplySelect All. ClickCreateto finish.
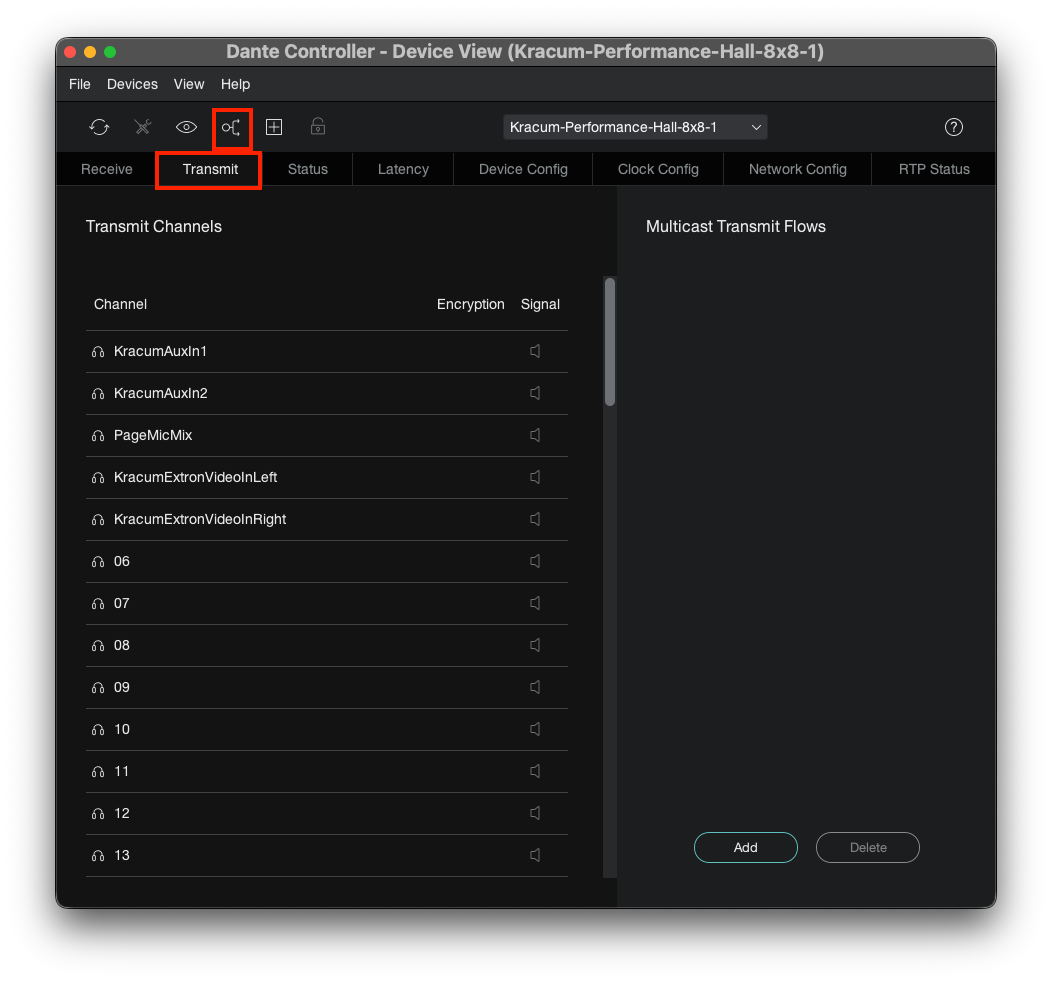
Dante Device View
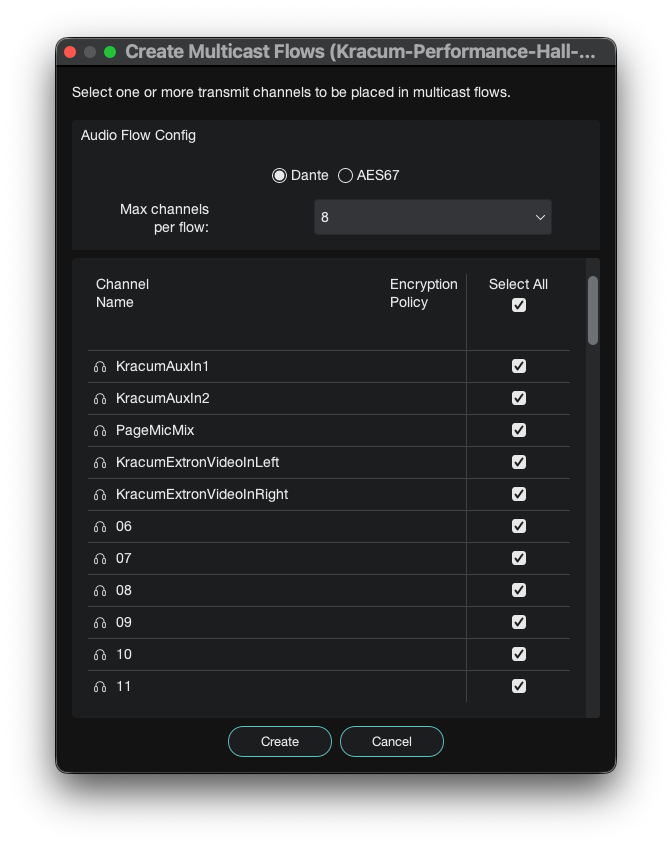
Dante Multicast
Note that if there is already a multicast flow containing a certain channel, you won’t be able to create another flow containing the same channel. If you wish to re-create flows, first select the flows to the right on the device view, delete them, and then follow the steps above to create a new flow. Audio will be briefly interrupted while you do this.
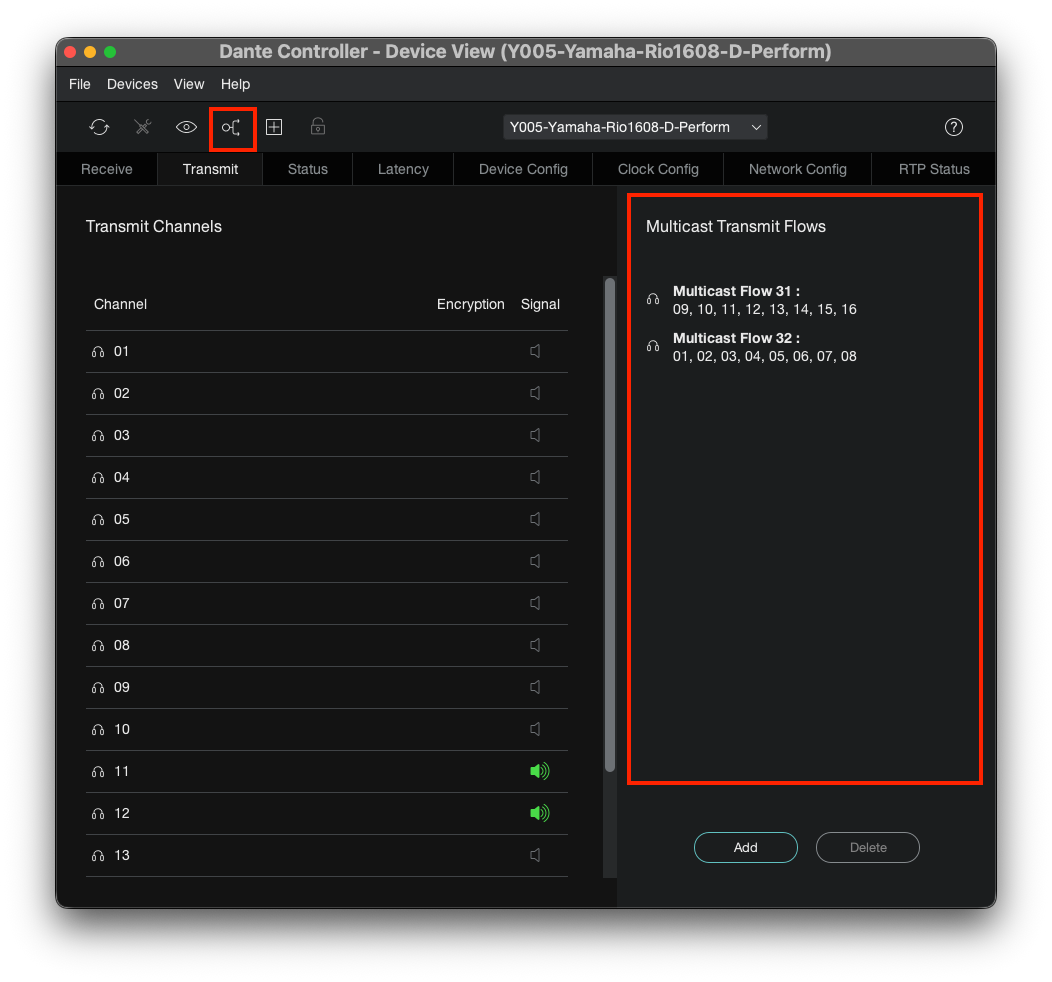
Dante Device View
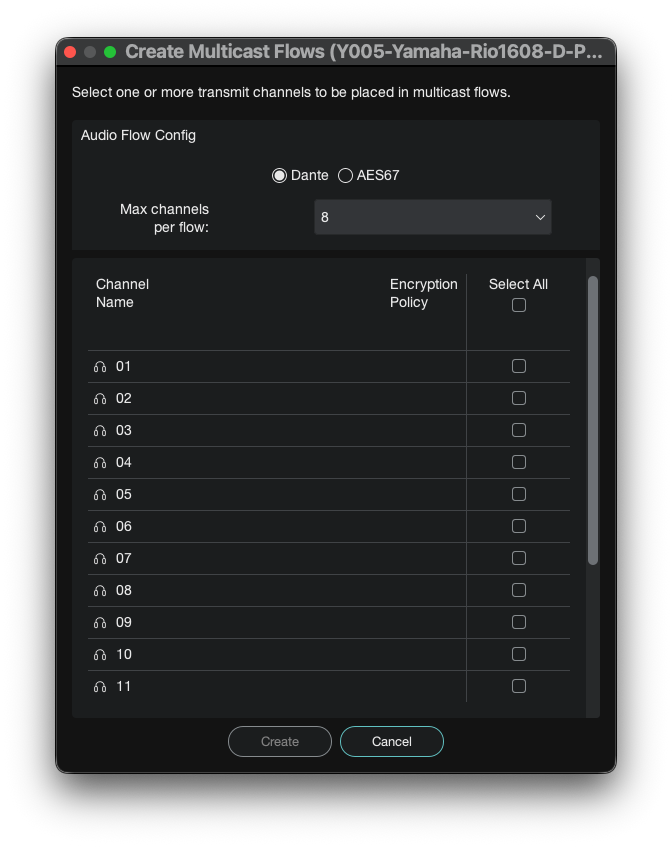
Dante Multicast