We use an ATEM 1 M/E Constellation HD as our main video switcher in Kracum. Applebaum has an ATEM Mini Pro ISO as a secondary video switcher. Both switchers (and other Blackmagic products) can be controlled with ATEM Software Control. The only difference is that the ATEM Mini allows for ISO recording of all video/audio sources and streaming, whereas the Constellation is just a (very powerful) switcher.
In addition to software, we use the ATEM 1 M/E Broadcast Panel to control the ATEM switchers. This is a fairly new addition to our ATEM family. The keyboard has similar functions to the software panel, and the main buttons are laid out in a similar M/E style, so it’s easy to move between the hardware and software interfaces.
Layout
The program bus, preview bus and source names display are used together to switch sources on the program and preview outputs.
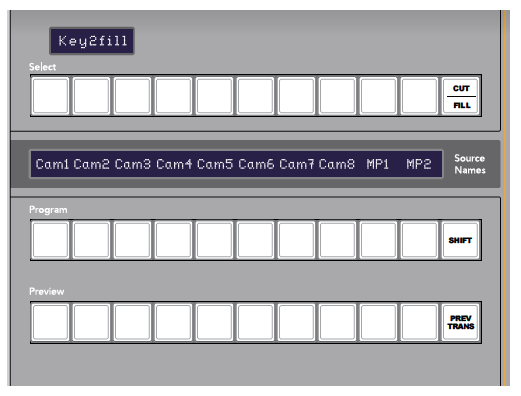
The source names display uses a 4 character label to represent the switcher’s external inputs or internal sources.
- Labels for the 8 external inputs can be edited on the settings tab of the software control panel.
- Labels for the internal sources are fixed and don’t need to be changed.
- Pressing the
SHIFTbutton will change the source names display to show extra sources. - Pressing the
SHIFTandCUT/FILLbuttons simultaneously will change the source names display to show protected sources, available for routing to auxiliary outputs. Protected sources areprogram,preview,clean feed 1andclean feed 2.
In particular, MP1 (labeled) Logo displays the Carleton Logo.

Program
The program bus is used to hot switch background sources to the program output. The source currently on air is indicated by a button that is illuminated red.
Preview
The preview bus is used to select a source on the preview output. This source is sent to program when the next transition occurs. The selected source is indicated by a button that is illuminated green.
Transitions
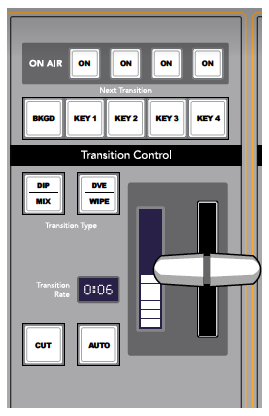
Cut
The CUT button performs an immediate transition of the Program and Preview outputs, regardless of the selected transition type.
AUTO and Transition Rate
The AUTO button will perform the selected transition (fade) at the rate specified in the transition rate window.
The AUTO button illuminates red for the duration of the transition and the transition rate display updates to indicate the number of frames remaining as the transition progresses.
Fader Bar and Fader Bar Indicator
The fader bar is used as an alternative to the AUTO button and allows the operator to manually control the transition. The fader bar Indicator next to the fader bar provides visual feedback on the progress of the transition.
Next Transition
The BKGD, KEY 1, KEY 2, KEY 3, KEY 4 buttons are used to select the elements which will transition on air or off air with the next transition.
- The default is
BKGD(Preview) - Pressing
Key 1puts theProjectorinput source to the bottom left ofPreview. - Pressing
ONaboveKey 1puts theProjectorinput source to the bottom left ofProgram.
Downstream Keys
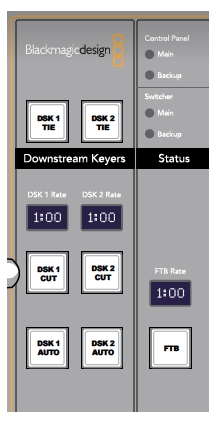
DSK TIE
The DSK TIE button will enable the DSK on the preview output, along with the next transition effects, and tie it to the main transition control so that the DSK can be taken to air with the next transition.
We don’t typically use this since QLab is doing the transitions for us.
DSK Cut
The DSK CUT button is used to cut the DSK on or off air and indicates whether the DSK is currently on or off air. The button is illuminated if the DSK is currently on air.
DSK AUTO
The DSK AUTO button will mix the DSK on or off air at the rate specified in the DSK rate window.
This is what QLab triggers during the lower-thirds cues.
Fade to Black
The FTB button will fade the program output to black at the rate specified in the FTB rate window.
Once the program output has been faded to black, the FTB button will remain illuminated red until it is pressed again, fading the program output up from black at the same rate.
System Control
The twelve menu buttons, the display window, the four knobs and the four soft buttons under the knobs together are called the system control. The 4 line display is used to identify the operation of the soft buttons and knobs.
The system control is context-sensitive and allows you to adjust parameters for the current operation.
PTZ control with Joystick
In particular, when combined with the joystick, it allows you to perform basic Pan, Tilt, and Zoom functions (PTZ) to the Sony cameras.
To do this:
- Make sure you’re in the home page of the menu.
- Press
PTZ > SDIand select the camera you wish to operate, i.e.,CAM 1. Cam number corresponds to the input number. For instance,Cam 2isHouse Center, andCam 8isApplebaum. - Use the joystick to pan, tilt, and zoom (with the zoom ring).